The complete guide to publish React hook as NPM package
I recently wanted to publish a bunch of React hooks as an NPM package.
I also needed it to be unit tested and written in TypeScript.
It turned out to be an interesting journey. I have decided to write down my findings and prepare a boilerplate with simple example, so that others can learn start to finish the full process.
I hope you will enjoy reading this guide and that you will find something useful for yourself as I have touched wide scope of topics.
In this article I will cover the following:
- how to create an NPM package exporting React Hook(s) — we will use classic
counterexample - how to write our hook in TypeScript and transpile it down to ES5 with Rollup
- how to write unit tests for our hook (we will learn how to setup Jest and React Testing Library)
- how to test our package locally with help from
yarn link - how to version our package to meet NPM semantic versioning
- how to publish our package to NPM registry so that it will be available for the world
TL;DR
Developers in general enjoy learning hands on.
If that sounds like you, and you want just the code, you can just:
- Clone my repository from
https://github.com/nekogd/react-hook-npm-publish-boilerplate
(the repository is setup and ready to go. The readme file in the repository covers all the necessary steps you have to take). - Look into the example hook
useCounterto get the feeling of the flow. Create your hook or tweak the flow as per your preference. - Login to your NPM account with
npm login - Once happy with work, version your package i.e.
npm version major - Publish your package to NPM i.e.
npm publish --access public - Share your work with the world (and ping me somehow if I helped you — as it gives me great joy :) ).
Prerequisites
- Some understanding of JavaScript, React, React hooks and TypeScript
- NPM Account (we can create one here)
- GitHub account (we can create one here)
Have we checked if similar package is already in place?
It’s important to take this step for various reasons i.e.:
- preventing packages duplication
- preventing building a package that no one will use (as there already is popular and battle proven alternative)
- we can inspect the code of existing solutions and learn some things and other approaches that way
The purpose of this guide is to understand the full process of building and deploying NPM package, hence we will assume that our useCounter hook is a very unique one.
The NPM registry and public packages
Our package will be available for public. The NPM registry public packages take format my-package-name.
They are open and available for anyone interested.
The link is constructed following the pattern: https://www.npmjs.com/package/my-package-name.
Developers all over the world are able to install public packages i.e.:yarn add my-package-name
ornpm install my-package-name
Private packages
Private packages are not accessible to the public. To publish a private package on NPM, we will need a paid user or organization account.
It’s useful if we want to create an internal tool for our company and still benefit from power of NPM registry.
Scoped packages
Scoped packages take the format @scope/my-package-name, where the scopeis usually your user name or the organization name on npm.
We can say that they belong to a certain namespace.
Scoped packages are private by default, but we can saynpm publish --access public
to make them public.
The developers can install scoped packages (which are marked as public) i.e.:yarn add @scope/my-package-name
or npm install my-package-name
NPM versioning
The NPM documentation describes versioning really well.
I will cover the very basics, just enough for us to get productive and have an understanding what are we doing.
Packages are usually versioned following the patternmy-package@1.4.7 where:
my-packageis the package name. For scoped packages, it’s something like@my-scope/my-package- we change first digit if we introduce
majorchange i.e. backwards incompatible features.
If we increment that digit, second and third digits reset to zero.
We can do that withnpm version majorcommand - we change second digit if we introduce
minorchange i.e. backwards compatible features have been released.
The third digit is reset to zero.
We can do that withnpm version minorcommand. - we change the third digit if we introduce
patchi.e. backwards compatible bug fixes.
We can do that withnpm version patchcommand. - we start new package versioning at
1.0.0
If we are Git users, we have an extra benefit, as git tags are created for us (but not pushed) automatically. With help of tags, we can explore our code at specific version just by checking the tag.
To add tags to our origin, we have to say:
git push --tagsDocumentation
I always encourage my teams to write at least high-level (bird view) documentation as there are great benefits coming from it.
For the NPM package, the documentation should be a bit more detailed then a bird view.
I believe that at least the following topics should be covered:
- What problem the package solves (why should the developers use it)
- Example snippets (lot’s of developers learn best by doing and following the examples)
- API exposed by the package (developers need to know options available for them)
- product roadmap (if applicable)
- How the package solves the problem
- Instructions for contributors
I encourage you to try and write part of the documentation prior to start coding, as in high level overview, use cases and so on.
This does not mean you should have to spend weeks polishing every comma, as it does not add up any more value.
I think that readme.md of your package is a good place to write the documentation as well as JSDoc.
Let’s learn by doing
First of all, let’s set up our workspace:
- Clone my package template from my repository https://github.com/nekogd/react-hook-npm-publish-boilerplate
- Run
yarn installto install the dependencies - Create a CRA app in another folder i.e.
npx create-react-app local-app-for-hook
Your workspace should look similar to:
workspace — react-hook-npm-publish-boilerplate (we will be working on hook) — local-app-for-hook (we will say import { useCounter } here)
Rollup
Rollup is a package bundler.
If you have cloned or forked my repository, you can omit this step as Rollup is already setup.
It’s still good to have an understanding how your bundler works hence I encourage you to read on.
Let’s install Rollup and all the plugins we’ll need in this project (we’ll also need Babel since it is used internally during transpiling).
yarn add rollup rollup-plugin-typescript2 rollup-plugin-sass babel-core babel-runtimeNext, we need to create file rollup.config.js and start working on it
import sass from 'rollup-plugin-sass'
import typescript from 'rollup-plugin-typescript2'import package from './package.json'
The Sass plugin transpiles Sass to normal CSS and inject it into our final build (no need to mport the CSS separately).
The TypeScript plugin transpiles TypeScript code to ES5 JavaScript.
We have to configure four more fields in the config file and then we’ll be done with basic setup Rollup.
input– which file is the root file i.e. the fileindex.tsthat has all the exportsoutput– where to bundle your file to and in what formatplugins– which Rollup plugins we want to use. We can also pass configurationexternals– which modules being used by the package should be supplied by the host environment (i.e. React should be served from the host to avoid conflicts we had experienced locally)
Our rollup file looks similar to:
import sass from 'rollup-plugin-sass'
import typescript from 'rollup-plugin-typescript2'import package from './package.json'export default {
  input: 'src/index.ts',
  output: [
    {
      file: package.main,
      format: 'cjs',
      exports: 'named',
      sourcemap: true,
      strict: false
    }
  ],
  plugins: [
    sass({ insert: true }),
    typescript({ objectHashIgnoreUnknownHack: true })
  ],
  external: ['react', 'react-dom']
}
It’s very simple config that we could build upon, i.e. if we would like to minify output js code, we could just install the plugin rollup-plugin-uglify.
yarn add rollup-plugin-uglify// then import in rollup.config.js
import { uglify } from ‘rollup-plugin-uglify’// then add uglify() to plugins array i.e.
  plugins: [
    sass({ insert: true }),
    typescript({ objectHashIgnoreUnknownHack: true }),
    uglify()
  ],
We can extend that in multiple different ways, above is basic example, just good enough for us to get started.
useCounter
The idea of our project that we will follow is very simple.
We will do groundbreaking useCounterhook.
Next, we will write some unit tests for it and publish our package to NPM.
Finally, we will learn how to use our package in React application.
The hook will return us an object with 4 properties for us:
- count: number (current count)
- increment: Function (function to increment the counter)
- decrement: Function (function to decrement the counter)
- reset: Function (function to reset the counter to initial value)
Our useCounter will accept parameter initialValue that we will default to zero.
We could formalize our needs like so:
type IUseCounterProps = {
  count: number,
  increment: () => void,
  decrement: () => void,
  reset: () => void
}const useCounter = (initialValue:number = 0): IUseCounterProps => {
  // our hook logic here
}
If you aren’t familiar with TypeScript yet, voidbasically means that function does not return value. Our increment, decrement and reset functions will not return value, that is why we can sayvoid.
To begin work on useCounter, we will import useState and set initialValue as well as return the count value.
import { useState } from 'react';export const useCounter = (initialValue: number = 0): IUseCounter => {
  const [count, setCount] = useState<number>(initialValue);

  return {count};
}
Let’s prepare handlers for incrementing, decrementing and reset:
import { useState, useCallback } from 'react';export const useCounter = (initialValue: number = 0): IUseCounter => {
  const [count, setCount] = useState<number>(initialValue);  const increment = useCallback(() => setCount((value) => value + 1), []);  const decrement = useCallback(() => setCount((value) => value - 1), []);  const reset = useCallback(() => setCount(initialValue)[initialValue]);  return {count, incrememnt, decrement, reset};
}
And that’s enough for our useCounterto be functional.
If you aren’t familiar with useCallback and useState, you can reach out to official React documentation.
You can also ping me and I will try to explain in more detailed and simpler way.
Testing package locally
I always encourage my teams to, if possible, prepare a small Proof of Concept first.
Putting a lot of work initially, only to find out there are things that block us (or worse — are impossible to overcome), is definitely not a great thing to do and not fantastic position to be in.
Therefore we should limit such threats by creating small prototypes and try to go through the process as much as we can to catch potential issues.
We are now ready to test our hook locally. To do it, we will use yarn link command.
- Navigate to your package folder i.e.
react-hook-npm-publish-boilerplate - Build the package with
yarn build. Folder/distshould be generated. - Type
yarn link— you should see success message in the console - Navigate to your application folder i.e.
local-app-for-hook. You can sayimport { useCounter } from ‘react-hook-npm-publish-boilerplate’and this will link to the package on your local computer. - Type
yarn start - This will lead to an error because there is a missmatch in React versions used by our package and our app.
- To counter it, navigate to your package folder and type
npm link ../path/node_modules/reactin our case it’snpm link ../local-app-for-hook/node_modules/react - We should be good to go.
A quick test
We can navigate to our local React application, import our useCounterhook and see if it works
import { useCounter } from 'react-hook-npm-publish-boilerplate';const ExampleComponent = () => {

  const { count, increment, reset, decrement } = useCounter();  return (
    <>
      <p>{count}</p>
      <button onClick = {increment}> Increment the counter </button>
      <button onClick = {decrement}> Decrement the counter </button>
      <button onClick = {reset}> Reset the counter </button>
    </>
  )
}
Unit tests
There is a lot of controversy surrounding unit tests. Should we do it, should we not, when should we do it, if so to what extent and so on. That’s an ongoing debate outside of our current topic.
Since this article is about NPM packages, we will narrow down the topic of unit testing to packages only.
I strongly believe that NPM packages should be unit tested to give extra layer of confidence and to serve as a documentation for other developers.
For our hook, we will be using Jest and React Testing Library.
Installation
My boilerplate already has this setup.
If you don’t use it, follow through to set it up:
yarn add @testing-library-react-hooks react-test-renderer
Next, open up the package.json file and into your scripts add "test": “jest":
"scripts": { "build": "rollup -c", "start": "rollup -c -w", "test": "jest"},
Also in the package.json we need to add:
"jest": { "transform": { ".(ts|tsx)": "ts-jest"}, "testRegex": "(/__tests__/.*|\\.(test|spec))\\.(ts|tsx|js)$", "moduleFileExtensions": [ "ts", "tsx", "js"], "modulePathIgnorePatterns": ["<rootDir>/dist/"]},
Now we will be able to say yarn test and if you take a loog at testRegexthis is where we are telling Jest where and what to will look for i.e. files ending with test.ts test.tsx test.js or files in folder named __tests__
Code
Now that we have installed our testing, tools it’s time to code.
To begin with, we need to create folder __tests__ (remember the testRegexabove? :)) and create new file index.test.tsinside it.
Our folder structure looks like so:
 — hooks
 -- useCounter
 --- index.ts (our hook code is here)
 --- __tests__
 ---- index.test.ts (our test code is here)
If unit testing is new for you, I am writing an article about it and will publish it soon — stay tuned.
You may have noticed that I’ve just scratched the surface of things that should be tested i.e. have not tested decrement — that’s a homework for you (if stuck you can check out my repository).
Below is just an example from which you should be able to extend to write tests for decrement and reset by yourself.
import { renderHook, act } from ‘@testing-library/react-hooks’;import { useCounter } from ‘../index’;describe('useCounter tests', () => {  it('should be defined', () => {    expect(useCounter).toBeDefined();  });  it('renders the hook correctly and checks types', () => {    const { result } = renderHook(() => useCounter());    expect(result.current.count).toBe(0);    expect(typeof result.current.count).toBe('number');    expect(typeof result.current.increment).toBe('function');  });  it('should increment counter from custom initial value', () => {    const { result } = renderHook(() => useCounter(10));    act(() => {      result.current.increment();    });    expect(result.current.count).toBe(11);  });
});
To run the test we just say yarn test (that is if you have not amended my package.jsonfile :) ).
Error Testing
We have written our unit tests, they are marked as green, are we good to ship?
Not quite.
I am going to show you why unit tests are not a 100% guarantee. Of course we could have write hundreds of them and that would hopefully cover all cases. It does however come with a price during build time and vastly increases development time.
We write our package in TypeScript but developers may use it with JavaScript. To counter it, we can add an extra layer of protection with PropTypes
// continueduseCounter.PropTypes = { initialValue: PropTypes.number.isRequired,};useCounter.defaultProps = { initialValue: 0,};
Now if JavaScript user would try to pass a stringconst { count } = useCounter('10')
the JavaScript console should throw an error.
The useCounter hook however would behave in a bad way (for incrementing it would append 1 i.e. 1011111 because that is what string concatenation is doing, for decrementing it would substract one.
Another kind of error is something like useCounter('I want to try you') as that string cannot be parsed to a number.
To protect against the errors we should add extra layers of protection.
Firstly, we will try to parse string to a number with help from parseInt().
If someone would say i.e. useCounter('10') our useCounterhook should parse it to number 10 and work as expected.
We will also log the message to the developer to ensure him to parse the data to a number.
That should cover most of the cases, i.e. API responded to us with string and other cases of minor errors.
if (typeof initialValue === 'string') {

  console.log('you have passed a string to useCounter. It still may   work however');  initialValue = parseInt(initialValue, 10);
}
Then there are those who would try something likeuseCounter('I really want to break you').
To counter them, we have to do three things (it’s an easy example :) ):
- Verify if
initialValueis anumber. We can do that with help fromisNan() - Log the message to the user that he should inspect his code or API response. Or process the response.
- Default the
initialValueto0. That way we will ensure that our hook will work.
if (isNaN(initialValue)) {  console.log('you really want to break the useCounter. Please pass a number as parameter. I am defaulting to zero.');  initialValue = 0;
}
Our final code looks like (please read the comments):
export const useCounter = (initialValue: number = 0): IUseCounter => {// first let's try to parse string to number i.e. '5' to 5if (typeof initialValue === 'string') {

  console.log('you have passed a string to useCounter. It still may   work however. Please pass a number to be sure.');   initialValue = parseInt(initialValue, 10);
}// if that fails, let's default the initialValue to 0if (isNaN(initialValue)) {
  console.log( 'you really want to break the useCounter. Please pass      a number as parameter');   initialValue = 0;
}// at this point we are now sure that initialValue is a number
// the rest is unchangedconst [count, setCount] = useState<number>(initialValue);const increment = useCallback(() => setCount((value) => value + 1), []);const decrement = useCallback(() => setCount((value) => value - 1), []);const reset = useCallback(() => setCount(initialValue), [initialValue]);return { count, increment, decrement, reset };};
In my opinion, this validation piece of code will definitely be useful in other hooks or other part of the application.
Let’s extract it to a helper functionand name it accordingly.
I will also show you a bit about JSDoc.
/*** The validator function returns* - input number for number or strings that can be parsed to a number* - 0 for other** @param {any} initialValue*              Value to be validated** @return {number}*         input number or 0 for wrong input** @example*        const validatedInitialValue = validateInitialValue(initialValue);*/
const validateInitialValue = (initialValue: any) => {if (typeof initialValue === 'string') {  initialValue = parseInt(initialValue);}if (isNaN(initialValue)) {  initialValue = 0;}
  return initialValue;};
JSDoc generates useful data for developers i.e. we have useful hint when we hover over the function name (I am in VSCode).
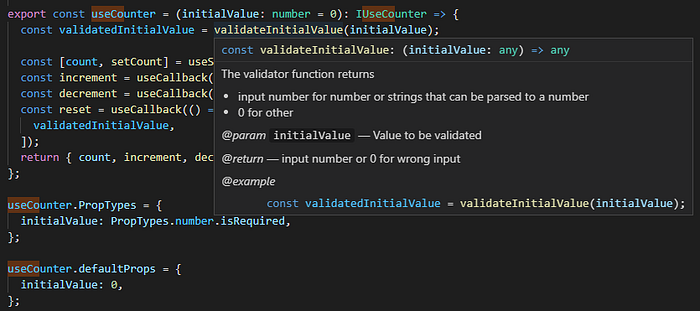
Then we will just say in our hook
import { validateInitialValue } from 'helpers/validateInitialValue';// unchangedconst validatedInitialValue = validateInitialValue(initialValue);const [count, setCount] = useState<number>(validatedInitialValue);
Also one change is needed in resetmethod due to useCallback
Our set count now watches for validatedInitialValuehence we need tell this to useCallback:
const reset = useCallback(() => setCount(validatedInitialValue), [ validatedInitialValue,]);
As a side note, for TypeScript user useCounter('5') the project would simply not build.
This however does not protect us from runtime errors, hence the need of PropTypesand error protection.
As you can see even with simple counter example there are few cases to consider and developers and QA engineers must smoke test them.
Publishing to NPM
We have smoke tested our counter, the unit tests are all green, we are confident that our package works.
We can now deploy our package to the NPM registry (we can safely unpublish it later if for some reason we are not happy with it).
I am assuming you are using my repository as a starter.
If that’s the case, navigate to package.json file and amend the following: name, description, author The name value is how your package will be known to the world. I recommend to start with scope naming i.e. @myusername/my-package-name.
Once that is done, we are only 3 steps away from deploying to NPM:
- Navigate to your package root folder, Type
npm login - Type
npm version major— this will increase version of our package to1.0.0 - Type
npm publish --access public - You should see a success message (or descriptive error)
That’s it. Now the developers all over the world will be able to use your work just by saying:
yarn add your-great-packageUnpublishing package
If, for some reason, we are not happy with our package, we have 72 hours to unpublish the package without any issues
npm unpublish <package-name> -fLinks
Links to the code that is related to the article:
The boilerplate code on GitHub
React application that consumes our NPM package (GitHub link)
React application CodeSandbox demo (it’s synced with GitHub)
My package on GitHub with hooks (started with this boilerplate)
Summary
That’s all that we need to start and get productive building NPM packages for React. We could tweak hoot to React Component by exporting .tsx file instead of .ts, all other principles from the article apply.
To sum up, we have learned how to:
- create and publish NPM package with custom hook
- understood a bit about NPM versioning
- understood a bit Rollup, transpilation, Jest
- understood a bit about unit testing
- created groundbreaking
useCounterhook with help of TypeScript.
I’ve also prepared an example React application that uses our NPM package and serves as a demo for the work we have done.
The code is on GitHub and I’ve used CodeSandbox to sync them to each other.
GitHub repository is here and we can access the application on CodeSandbox. Have a look how easy it is to use our hook in the application.
I had enjoyed writing this guide and I hope you had enjoyed reading it.
I am currently in the process of creating more guides around JavaScript and React so stay tuned.
Have fun and let me know what packages you have built!